The Gadgets Page

December 13, 2005

10 Gadget Gifts under $100

Filed under: Kitchen Gadgets,Misc. Gadgets — Michael Moncur @ 5:00 am

Looking for a holiday gift for someone who enjoys gadgets? Here are ten devices that would make great gifts, all under $100. While most of these aren’t groundbreaking new inventions, it’s amazing what you can get for $100 these days. Many of these items would have cost quite a bit more last December.

Some of these are things we’ve bought in the last year and will be reviewing in detail here soon. Others just looked like a great deal. Got any better ideas for gifts, or comments about any of these? Let us know by leaving a comment.

(Continue Reading…)

December 12, 2005

Why Isn’t Singstar Available in the U.S.?

Filed under: Toys and Games — Laura Moncur @ 2:18 pm

I hate it when I read a review of something that is available in tons of countries, but not the United States. This game, which seems like it would be similar to the Karaoke Revolution games that I love so much, is available in tons of other countries in Europe.

I thought America was a huge market for video games. Why haven’t they made at least one of these for us? Is it the licensing issues? Do I have the RIAA to blame for denying me really fun games to play?

If you have a PlayStation 2 that works with other regions, then you could order the game from Amazon UK, but I don’t have that option.

I think I’m going to run into these problems more and more the longer I hang on to my old Xbox. I sure hope Playstation 3 is backwards compatible. At least my current dance pads would work with them. All I can hope is that I don’t feel more and more left out until we are able to see what the future will look like.

Via: the play girlz gaming blog » Random Gaming Stuff

December 11, 2005

Getting the most from your LCD monitor

Filed under: Computers and Peripherals — Michael Moncur @ 1:16 am

I’ve been using an LCD monitor for several years and I’ll never go back to a CRT—while the colors aren’t as clear, at least on my ancient LCD, it’s tiny, looks cool, and most importantly I haven’t had a problem with eyestrain since switching. Since LCD monitors have crossed a price threshold and are now becoming more common than CRTs, here are three tips that might be helpful to flat panel display owners.

Resolution

Unlike CRTs, LCD monitors really only work at a single resolution setting, called the native resolution. There are an exact number of pixels on an LCD, so a higher resolution is impossible. Most models will let you switch to a lower resolution, but they only approximate it by combining native-resolution pixels, which results in a blocky, hard-to-read display.

The native resolution is usually 1024 x 768 for 15″ monitors, or 1280 x 1024 for 17″ monitors. See your monitor’s specifications to make sure, or check your computer’s resolution settings—if your monitor has the correct drivers, the largest resolution you can choose will be the native resolution.

If you find your monitor’s display looks odd, make sure that your computer is set to its native resolution. This does not happen automatically, and I’ve even seen big-name computers with bundled LCDs that arrive set to a lower resolution than the native one.

Font Smoothing (ClearType)

ClearType up close One problem with LCD screens is that the characters seem pixelated—as far as I’m aware, that’s just because the pixels are perfect squares with no overlap, but it still doesn’t look as good as a nice CRT. Microsoft’s ClearType, available since Windows XP, solves this problem by using subpixel rendering: to make a long story short, it takes advantage of the offset between the red, green, and blue portions of each pixel on the screen to get higher-resolution text. There’s an occasional color artifact, but the clear text is worth it.

You can turn on ClearType from the Display Control Panel (select the Appearance tab, then click Effects), but for the best performance you should use the ClearType tuner. It’s available as a web tool or as a control panel applet.

MacOS X also supports a similar feature called Font Smoothing. To change its settings, run the System Preferences utility and select the Appearance icon. Near the bottom of the dialog is a font smoothing style drop-down where you can choose Standard, Light, Medium, or Strong. Apple recomments Medium for LCD displays, but you might want to experiment with the others and see what looks best.

Incidentally, if your eyes have trouble reading text at your monitor’s native resolution, sometimes switching to a lower resolution and turning on font smoothing doesn’t look too bad.

Calibrating LCD Monitors

test image There are two types of LCD monitors, analog and digital.

Which type do you have? If your monitor is hooked up to the PC with a normal 15-pin monitor cord, it’s analog. If it’s hooked up with a DVI connector, it’s digital. Some of the newer ones support both, but you need a DVI cable and a card that supports it to use digital mode.

Analog LCDs work surprisingly well—I’ve used one for years–but they seem to need calibration every now and then. Most have an “Adjust” or “Auto” button that automatically calibrates the display. Mine drifts out of calibration every week or two, and sometimes I don’t notice until I get a headache from reading text.

I created the image above and put it in my browser’s homepage to remind me to calibrate my monitor. It’s composed of alternating black and white pixels. When the monitor is out of alignment, the image comes to life like TV static for some reason. If you have an analog LCD, try pressing your Calibrate button to see what I mean, and feel free to copy the image if it’s helpful.

December 9, 2005

The Bell Spinfit Calorie Speedometer

Filed under: Cars & Transportation — Laura Moncur @ 5:00 am

View speedometer details at AmazonI purchased the Bell Spinfit Calorie Speedometer for my bike at the beginning of spring this year. The biggest risk with a bicycle speedometer is that when you store your bike away for the winter, you’ll forget how to reset the speedometer and get it in some stupid mode where you have to remember the magic number for your size tire. Worst of all, by the time next spring rolls around, you know I’ve lost the instruction booklet. How does this speedometer rate now that I’ve lost the booklet?

Fortunately this speedometer is easy enough to use that I don’t really need to hunt down the instruction manual each time I try to use it. The top button changes the display from Calories Burned to Speed (MPH). If you hold down the button while on Calories Burned, it will clear that screen so you can reset it for each workout. The bottom button switches between Time, Trip Time (Chronograph), Trip Distance, Odometer, Average Speed and Max Speed. The Chronograph will stop counting when the wheels stop spinning, which is very convenient if you’re timing how long you’ve been working out. You can reset the Chronograph and the Trip Distance by holding down the bottom button while you’re in Trip Distance mode.

I have lost my instructions, so I don’t know how to reset it for my weight or what the magic numbers are for my tire size, so when I have to change the battery, I’m out of luck. I wish the manufacturers of these speedometers would just let us input 27 inches for the size of our tire. It would take a little more programming, but it would greatly increase the ease of use. It would also be helpful if Bell would have PDF files of their instruction manuals online so that when someone does lose their manual, they’re not lost.

The instructions state that the sensor should be mounted on the front tire, and that’s the easiest way to install it. If you’re going to use this speedometer with a bike on an indoor trainer, then you should mount it on the back tire. If you missed it, here are the instructions on how to do that.

I have really liked this speedometer because it’s easier to use than others I’ve had in the past. It’s very easy to reset the Trip Distance and I really like that the Chronograph stops counting when the wheels stop turning. It’s a great buy and I have really enjoyed using it.

Update 06-23-06: I’ve received so many comments about the instruction manual that I scanned mine in. You can find it here:

December 8, 2005

First Glance: DDR UltraMix 3

Filed under: Toys and Games — Laura Moncur @ 2:22 pm

View game details at AmazonI purchased DDR UltraMix 3 the day it came out. I don’t really feel like I can give this game a full review because I’ve spent most of my time playing it in the Quest Mode.

The only complaint I have right now is that it takes an inordinately long time to load the game once you’ve purchased all the available song packs. The same number of song packs take no time to load when I’m playing with DDR-UM2, but it takes at least a minute to load with all the song packs with the new game. I just start the song packs loading and use the time to fill up a water bottle and get a towel to wipe off my face when it gets sweaty.

DDR-UM3 has the benefit of tracking your activity level in any mode that you play. The older games would require you to play in the Workout Mode in order to track your calories and time played, but now you can do that in any mode with the new game. When I saw that feature on one of the PlayStation 2 releases of DDR, I was so jealous I almost convinced Mike to buy a PS2.

DDR-UM3 Quest Mode

The reason I’ve played in Quest Mode more than any of the other modes is because I’m curious. There is a map and I can travel to a lot of places. I’ve yet to really earn enough points to “gain a following” in a city. I keep coming back to that mode to see if I will eventually make progress in this game. I’ve played for hours on end and I’ve only earned 4,356 points. I need 73,100 to earn a following in Seattle. I don’t know if that means that I’m a really crappy dancer or if I started on the wrong city. I’m tempted to start the game again using a different controller port and see if it’s any easier. In the meantime, I’ve gotten in some great workouts.

On the whole DDR-UM3 has all the features that I loved about the first two DDR games released for the Xbox. There are some game features where you compete against other players that I’ve never really been able to use because I don’t have any friends as obsessed with DDR that will play with me. It seems like Konami is getting better and better at making DDR an interesting game to play. I just feel a little betrayed by Xbox 360 because none of the DDR games or my dance pads will work with the new system. I guess when it’s time to upgrade, we’ll go with PS3.

December 7, 2005

Making Your Bike Speedometer Work With a Bike Trainer

Filed under: Misc. Gadgets — Laura Moncur @ 5:00 am

View speedometer details at AmazonThe directions for bicycle speedometers say to attach the sensor to your front tire. When you use a bicycle trainer (like the CycleOps Trainer I reviewed last week), the front tire remains stationary and the only tire that is moving is the back tire. Is it possible to attach the sensor to the back tire? Does it affect the mileage calculation?

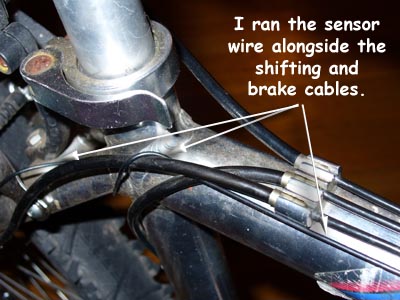
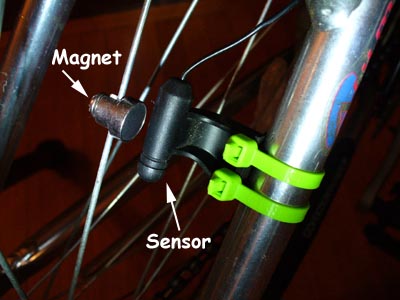
If your back tire is the same size as your front tire (most are), then you won’t have to reprogram your speedometer. If you just bought your speedometer, then you’ll have to program it using the size of your back wheel. The Bell Spinfit Calorie Speedometer, which is the speedometer I have on my bike, has plenty of wire to reach the back tire. Attaching it to the back tire was actually easier for me than attaching it to the front because I didn’t need to figure out what to do with all the extra cord.

The biggest problem with attaching the sensor to the back tire is that the frame is further from the spokes on the back tire. The Bell Speedometer didn’t have a problem with that and I was able to position the sensor so that it was close enough to the magnet on the spokes. Other brands might need some help with this matter. One way of bringing the sensor closer would be to wrap electricians tape or duct tape around the frame until the sensor was close enough to the spokes. This might interfere with removing the back tire, so if you have to do that often, take that into account. As it was, I was able to attach it quite easily using cable ties (the bright green bands pictured here).

Ironically, a workout on an indoor trainer is a lot harder than one outside in the real world, so the eight and a half miles I did on my last workout felt so intense that I couldn’t believe that I only went eight miles. It’s not a problem with the speedometer, however, the resistance is just so much that I get an incredible workout. It feels like I’m going uphill the entire time.

The entire process of changing my speedometer from my front tire to my back tire took a total of about five minutes. The hardest part was getting past my fear of putting it on the back tire. I thought that if the sensor was meant to be put on the back tire, then they would have given alternate directions for it. As far as I can tell, as long as the sensor can reach the magnet on the spoke, there is no problem with putting it on the back tire instead of the front. The best part is that I get a measurement of my workouts in something more than time.

December 6, 2005

A million uses for your camera phone

Filed under: PDAs and Phones — Michael Moncur @ 5:44 am

Laura’s recent post about a unique use for your camera phone reminded me of a post from Merlin Mann’s 43 Folders a while back that lists lots more uses for camera phones:

I generally tell anyone who asks that camera phones are worthless, but this list has some ideas even I might use—like taking a picture of the sign to remember where you parked, or grabbing a photo to remember a store’s hours. Be sure to skim the comments too, as the readers had lots of ideas.

December 5, 2005

How to avoid PalmOS Crashes

Filed under: PDAs and Phones — Michael Moncur @ 1:12 am

TreoCentral has a review of a replacement battery cover for the Palm Treo 650. They start the review with a sentence that threw me for a loop:

If the phrase “if I had a nickel for every time I had to reset the Treo” has ever crossed your mind, the Seidio Battery Cover with reset hole is a must.

I’ve been using the Treo 650 for nearly a year. If I had a nickel for every time I had to reset my Treo, I’d have… a nickel. Mine crashed once the day I bought it, when I overfilled the memory with software, and I haven’t had a crash since.

Nevertheless, Palm machines—not just the Treo—have a reputation of crashing more often than Microsoft Windows. Seidio isn’t insane—they actually saw a market for a special battery cover to enable quicker resets, and they’ll probably sell some.

It doesn’t have to be this way. Got a crash-prone Palm? Don’t buy a new battery cover to make it easier to reset, fix it. Here are some tips to make your Palm as stable as mine.

Why Does it Crash?

Operating systems, like PalmOS, divide a device’s memory between applications and the OS. At any given time, your Palm’s memory might be divided into sections for various portions of the core operating system, the application you’re running right now, and maybe a background application or two.

Ideally, each program would use its portion of the memory, and ignore the rest. Unfortunately, sometimes a badly-written application will access memory outside its own range, which can lead to corrupted data or to a crash.

Modern operating systems use a system called memory protection to prevent each application from messing with memory that belongs to the OS, or to another application. PalmOS, as you may have guessed, has very poor memory protection. Protected memory is one of the features touted for PalmOS 6.0 (Cobalt), announced over a year ago. Unfortunately, no current Palm device includes the Cobalt OS—not even the two new ones—so for now we’re stuck with the older, unprotected version.

Less Applications, Less Crashes

With Palm’s unprotected memory, any application can potentially cause a crash, and with thousands of applications available, it’s no surprise that the majority of Palm users have experienced crashes. To avoid crashes, you need to manage your installed applications carefully:

  • Consider whether you really need an application before installing it.
  • Remember that any application can cause crashes, including optional software that came with your Palm. Don’t install it unless you need it.
  • Check your list of installed software regularly and remove applications you no longer use.
  • If possible, avoid applications that run in the background—for example, Graffiti replacements and pop-up accessories. Since these are running all of the time, they have the potential to crash your Palm any time, not just when you’re using them.
  • Install only one application at a time, and test the Palm for a day or two before you install any others.

Fortunately, there’s a great deal of stable Palm software out there that is unlikely to cause crashes—for example, Astraware’s games and Tealpoint’s applications. Once you find an application you can trust, it’s unlikely to be a problem.

How to Crash-Proof Your Palm

If you’re already dealing with frequent crashes, I suggest you make a fresh start:

  1. Install the latest updates for your Palm from Palm support. Some crashes are caused by buggy system software, so eliminate those first.
  2. Sync your Palm to a computer and view the log to make sure the sync was successful.
  3. Select App | Delete and delete everything in the list except applications you’re sure you need.
  4. Soft reset the Palm using the Reset button.
  5. Test the Palm for a few days. If it no longer crashes, you’re done.
  6. Still crashing? Try deleting all applications. (If you’re sure you have backups of the installation files for all of your software, a hard reset will do this quickly.) You should now have a Palm with only the built-in software, and no crashes.
  7. Now reinstall each application you need, one at a time. (You can usually find your deleted applications in your Palm\username\Archive directory.) After each one, try switching between applications and using every feature you can think of, and see if you run into crashes.

Troubleshooting Crashes

If you make sure to install applications one at a time and use your Palm for a while before installing anything else, it’s easy to guess which application causes a crash—it’s usually the one you installed last. Also, if crashes always happen within a certain application, it’s probably due to a bug in the application. If they happen randomly in many different applications, you’re probably dealing with a background program or, rarely, a bug in PalmOS itself.

If you’re using a Treo 600 or 650, there’s a built-in debugging feature that will tell you which program caused the most recent crash. Try dialing the following special code from the phone application:

  • ##377 (Sprint / CDMA phones)
  • #*377 (GSM phones)
  • #*#377 (Verizon)

After you enter the correct code and click Dial, a dialog displays the date, time, program, and error message for the most recent crash. This is especially useful since crashes will sometimes reset the Treo without displaying a message.

Unfortunately, the application causing your crashes might turn out to be one you really need. In that case, your best bet is to contact the person or company who produced the application, describe the circumstances that cause the crash in as much detail as possible (including the specific error message from the Treo debugger) and see if an update is available. No update? Choose a different application, or invest in that easy-reset battery cover.

Conclusion

I realize this is drastic advice—Palm sold you a device that can run thousands of great games and applications, and I’m telling you to install as few as possible. But with Palm’s touchy memory, that’s the only way to prevent crashes.

If you’re willing to give up unstable software—and consider all software unstable until proven otherwise—you can have a crash-proof Palm.

Update 12/6/05: Added Treo crash diagnostic details. (Thanks Sam!)

December 2, 2005

First Glance: CycleOps Mag Indoor Bike Trainer

Filed under: Misc. Gadgets — Laura Moncur @ 5:00 am

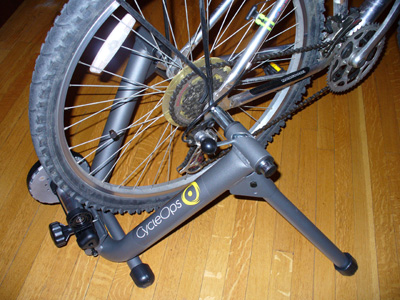
CycleOps Mag + Indoor Bike Trainer (9006) I purchased the CycleOps Mag Indoor Bike Trainer a few days ago. Once the snow started to fall here in Salt Lake City, I sadly locked up my bike, thinking I wouldn’t see it again for at least four months. I resigned myself to ill-fitting exercise bikes at the gym. I just wished I could ride my own bike instead. This trainer gave me the chance. Read more to find out whether it’s a pain in the butt or not…

At the store, the salesmen said that I needed to change my back tire to a slick. The first salesman said that the trainer wouldn’t work with a mountain bike tire. The second salesman said that it would work, it would just make a horrible noise and vibrate my house to pieces. I even had a man who had purchased a trainer who was in the store buying a tire to put on his bike to make the vibration stop. I must have really strange mountain bike tires because mine works fine. There is some vibration and a little noise, but it’s quieter than the exercise bike I used to have and it’s quiet enough for Mike to sleep through my workout this morning.

The CycleOps Bicycle Trainer

Attaching the bike to it was pretty easy, especially since I didn’t need to change my back tire. I didn’t change the quick release lever because the one on my bike was the same style. All I had to do was adjust it a little and attach my bike. I was able to ride it within 30 minutes of opening the box.

Working out with the trainer is actually harder than riding my bike around town. I rode my bike to work every day for months and the only time it was really difficult was when I had to ride up the huge hill that goes over I-15 and the train tracks. Now, with the tension settings on the trainer and my gears, I can make it hard enough that I can barely move the pedals. Hopefully, I’ll work up to that level, but for now, I can keep my heart rate above 70% of Max with the gears at a much lower level. Even the lowest gear possible is high enough to almost put me in the 60% of Max zone. I’m so glad I have a heart rate monitor. I would be tempted to push myself a little too hard with this gadget.

The trainer comes with a workout DVD. I did a review of the DVD for Starling Fitness and you can see it here:

View riser details at Amazon The front of the bike would be kind of loose and tilty if I didn’t get a riser. I got the Kinetic Riser Block. It has four heights, so you’re pretty likely to find one that feels good and works with your trainer. This one seemed a lot more stable than the CycleOps Riser Block.

On the whole, I’ve been very pleased with the CycleOps Bike Trainer. Being able to workout in my home on my own bike is so much better than going to the gym and trying to get comfortable on the one-size-fits-all exercise bikes.

December 1, 2005

Hammacher Schlemmer Offers “Virtual Reality”

Filed under: Toys and Games — Laura Moncur @ 2:23 pm

It looks like all of the “exertainment” and “virtual reality” games were snatched up by Hammacher Schlemmer:

When these were released over the last few years, I sincerely thought they were going to revolutionize the gaming and exercise world. It’s impossible to actually purchase an exercise bike that connects to your Xbox or PlayStation, but these things will be available until they are gone or broken.

I have my doubts about how active they can actually be, especially the virtual reality games that require the child to wear a visor like the one pictured. That game just looks like a recipe for injury.

I am eager, however. to see the second generation of exertainment. Considering the power of the Xbox 360 and the awaited PlayStation 3, there should be a multitude of options out there for companies that really want to break into that field.

Via: Shiny Shiny: Interactive Snowboarding Simulator

« Previous PageNext Page »

Powered by WordPress
(c) 2003-2017 Michael Moncur, Laura Moncur, Matthew Strebe, and The Gadgets Page